What you’ll learn in this post
The #1 rule: do not use your work account
Even if you already have access to Microsoft 365, Entra ID, Azure subscriptions, or security tooling at work, your employer’s tenant should not be your practice environment.
• You may violate company policy
• You can trigger alerts or investigations
• You do not control permissions or billing
• Lab mistakes can affect real users and production services
A proper lab should be disposable, isolated, and fully under your control. That freedom is what lets you test, misconfigure, fix, rebuild, and actually learn.
Your best option: a personal Azure account
For most people starting cloud security labs, the best path is a personal Microsoft account tied to a personal Azure subscription. This gives you full ownership of the environment and keeps your learning separate from work.
Free Azure Account
Best for getting started. Good for testing the portal, creating small resources, and learning the basics without committing to a large spend.
Pay-As-You-Go
Best once you move beyond the initial free period. It works well if you stay disciplined with resource size, shutdown habits, and cleanup.
Free / Low-Cost Services
Some Azure services remain free or inexpensive within limited usage. This is ideal for lab repetition and small proof-of-concept builds.
Personal Microsoft account → one Azure subscription → one resource group per lab → budget alerts turned on from day one.
How subscriptions work in plain English
Azure terminology can feel more complicated than it needs to be at first. For lab purposes, here is the simple version.
This is the main container tied to spending, access, and ownership.
This is where you organize related resources so they can be managed or deleted together.
Virtual machines, storage accounts, virtual networks, Log Analytics workspaces, key vaults, and so on.
How to avoid unnecessary costs
Azure is a great learning platform, but it is also very easy to leave something running and forget about it. Good cost habits are part of good lab design.
Do not wait until later. Add a budget alert as soon as the subscription is available.
For learning, you usually do not need large VM sizes, premium disks, or high-throughput services.
Compute resources can continue costing money even when you are not actively touching them.
If a lab is done, remove the resource group. That is often the cleanest and safest option.
Advanced logging, monitoring, SIEM features, and continuous protection services can become the fastest cost multipliers in a lab.
Azure portal walkthrough
The following screenshots walk through the core setup flow for building a safe Azure lab environment. Each step highlights the key areas to understand before deploying resources.

Starting with a personal Azure account
Begin with a personal account that you fully control. This keeps your lab isolated and allows you to freely test, reset, and rebuild environments.
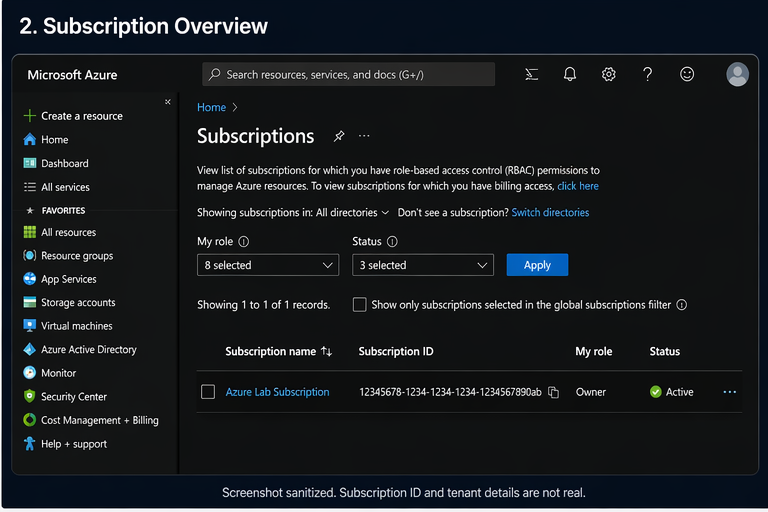
Viewing your subscription
The subscription acts as the primary boundary for billing, access, and resource ownership within your lab environment.

Creating a resource group
Organize each lab into its own resource group so environments can be managed and removed cleanly when no longer needed.
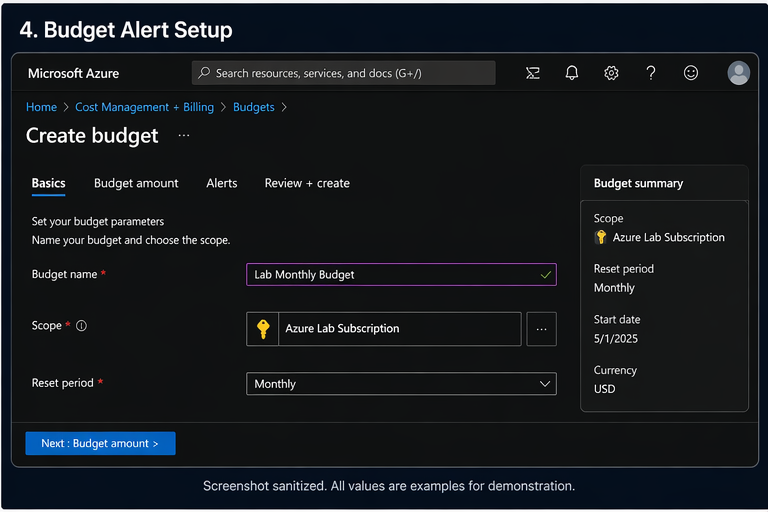
Setting a budget alert
Budget alerts provide visibility into spending and help prevent unexpected costs as you build and test resources.
Azure security lab series
This guide is part of a structured lab series focused on building practical cloud security skills step by step.
What Account Should You Use for Azure Security Labs?
Learn the safest account model, subscription basics, and how to control cost from the beginning.
Read Part 1Build Your First Safe Azure Security Lab
Create a simple lab structure with resource groups, naming standards, and safe cleanup practices.
Coming nextIdentity Basics for Azure Security Labs
Build around users, roles, least privilege, and identity concepts used in real environments.
Coming nextLogging, Monitoring, and Security Visibility
Add logging, monitoring, and visibility needed for investigations and detection workflows.
Coming nextFinal takeaway
The best lab account is the one you fully control, can afford, and can destroy without consequences. That freedom is what turns cloud study into real cloud skill.
Start small. Keep it isolated. Add budget alerts early. Build only what helps you learn.